Discover the Ways to Propagate Hens and Chicks and the steps needed to successfully grow these hardy succulents!
In this article, we will explore the different Ways to Propagate Hens and Chicks that will help you to multiply these plants in the easiest ways!
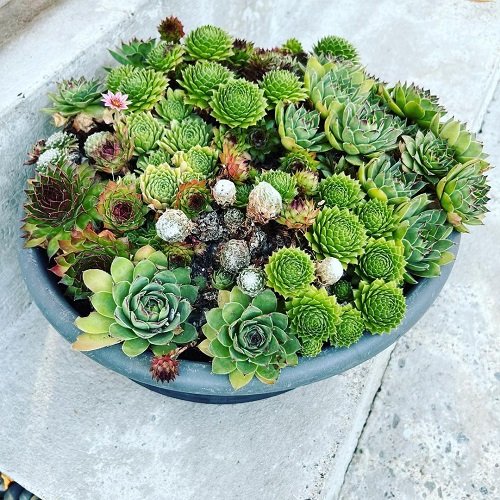
Here are the best hens and chicks you can grow
Hens and Chicks Plant Information

The hens and chicks plant, also known as house leek, is a succulent that forms a mat-like growth pattern. It features fleshy, pointed leaves that are arranged in rosettes. The main rosette is referred to as the “hen,” while the smaller rosettes that sprout from it are called the “chicks.” This plant thrives in temperate to warm, dry climates, ideally in locations that receive full sun to light shade.
When planting hens and chicks, it is crucial to ensure well-draining soil. Sandy or gravelly soil is particularly favored by this succulent, making it a popular choice for landscapes that include rock gardens, wall crevices, or areas where other plants struggle to thrive.
Hens and Chicks (Sempervivum) are charming and resilient succulents that can easily be propagated to expand your collection or share with fellow plant enthusiasts.
Here are Different Types of Hens and Chicks Varieties
Are Both Sempervivum and Echeveria Hens and Chicks?
While both Sempervivum and Echeveria are commonly referred to as “hens and chicks,” they are actually two different genera of succulent plants. The term “hens and chicks” is a common name used for various succulents that produce offsets or small rosettes around the base of the main plant, resembling a mother hen and her chicks. Let’s take a closer look at each of these genera:
- Sempervivum: Sempervivum, also known as houseleeks or hen and chicks, is a genus that includes several species of succulent plants. They are known for their rosette-shaped leaves that grow in a spiral pattern. Sempervivum plants are hardy, drought-tolerant, and typically grow in clumps or mats. They are native to mountainous regions of Europe and can tolerate colder climates. Their leaves are usually fleshy and have pointed tips.
- Echeveria: Echeveria is another genus of succulent plants that is often called “hens and chicks.” They are native to Mexico and have rosette-shaped leaves with rounded or pointed tips. Echeveria plants come in various sizes, colors, and textures, making them popular choices for succulent gardens and indoor plant collections. They are generally less cold-hardy compared to Sempervivum and are more suitable for warmer climates or indoor cultivation.
While Sempervivum and Echeveria share some similarities in their growth habit and the formation of offsets, there are differences in their appearance and specific care requirements. It’s important to understand the specific needs of each genus to provide them with the proper care, including light, water, and temperature requirements.
Best Ways to Propagate Hens and Chicks
These techniques are for Sempervivum, but you can also follow the process for Echeveria.
1. Growing From Pups

Division is one of the best ways to propagate hens and chicks. It is also the easiest and the most straightforward method. It involves separating the offsets, or “chicks,” from the main plant, known as the “hen,” and replanting them individually.
Steps:
- Look for mature Sempervivum plants that have produced offsets or pups. These are small rosettes that grow around the base of the main plant.
- Select healthy and well-developed pups for propagation. They should have their own set of leaves and, ideally, some root growth.
- Carefully remove the selected pups from the main plant. Use your fingers or a clean, sharp knife to separate them, taking care not to damage the roots.
- Allow the separated pups to dry and callus over for a day or two. Placing them in a shaded area with good airflow helps to promote callusing.
- Once the pups have callused, plant them in their new location. Dig a small hole and place the pup inside, ensuring the roots are positioned properly and covered with soil. Press the soil gently around the base of the pup to secure it in place.
- After planting, give the pups a thorough watering to settle the soil and encourage root growth. Ensure the soil is moist but not waterlogged. Avoid overwatering, as Sempervivum prefers dry conditions.
- Place the pups in a location where they receive bright sunlight. Sempervivum thrives in full sun or partial shade.
- Over time, the pups will establish themselves, develop roots, and grow into mature Sempervivum plants. Monitor their growth and continue providing appropriate care as they thrive and form their characteristic rosette shape
2. Leaf Cuttings

This method involves removing individual leaves and using them to grow new plants.
Steps:
- Choose a mature Sempervivum plant with healthy leaves.
- Gently twist or cut off a healthy leaf from the main plant. Make sure to get a clean break, including a small piece of the stem (about 1/4 to 1/2 inch long) attached to the base of the leaf. Remove any lower leaves from the stem, leaving only the top cluster of leaves intact.
- Place the leaf cuttings on a tray or a piece of paper towel in a warm and dry location. Let them sit for a few days to allow the cut ends to callus over. This helps prevent rot when planting.
- Sempervivums thrive in well-draining soil. You can create a suitable mix by combining equal parts of potting soil, coarse sand, and perlite or pumice. Fill a small pot or tray with this well-draining soil mixture.
- Once the leaf cuttings have callused, place them on top of the soil mixture. Gently press the cut ends into the soil, ensuring they make good contact. You can plant multiple leaf cuttings in one container, keeping them a few inches apart.
- Use a spray bottle to lightly mist the soil to provide moisture without saturating it. Ensure the soil remains slightly damp but not overly wet.
- Place the container in a location that receives bright, indirect light. Avoid exposing the cuttings to direct sunlight, as it can cause them to dry out or become scorched.
- Over the next few weeks, the leaf cuttings will start developing roots. It’s important to be patient during this process, as it can take some time for new growth to appear.
- You can carefully transplant them into individual pots or your desired garden location.
Propagate Any Plant Cutting Quickly Using this Trick
3. Seed Propagation

Do note that seeds from hybrid plants might not yield offspring that faithfully resemble their parent plants.
Steps:
- You can purchase Sempervivum seeds from a reputable nursery or online seed supplier. Make sure to choose a variety that suits your preferences.
- Sempervivum seeds are tiny, so you’ll need a shallow container with good drainage. Small seed trays or shallow pots work well. Clean the container and make sure there are drainage holes in the bottom.
- Create a seed-starting mix by combining equal parts of potting soil, coarse sand, and perlite or pumice. Fill the planting containers with this mixture, leaving a small space at the top.
- Sprinkle the Sempervivum seeds evenly over the soil surface. Since the seeds are tiny, it’s helpful to mix them with a small amount of sand or fine vermiculite to ensure even distribution. Press the seeds gently into the soil, but do not cover them completely as they require light for germination.
- Use a spray bottle to mist the soil surface lightly, providing moisture for the seeds to germinate. Make sure the soil is evenly moist but not overly saturated.
- Place clear plastic wrap or a transparent lid over the containers to create a greenhouse-like environment that helps retain moisture. This helps create a humid microclimate for seed germination.
- Keep the container in a location that receives bright, indirect light. Avoid exposing the seeds to direct sunlight, as it can cause excessive drying or heat.
- Sempervivum seeds germinate best at temperatures around 65-75°F (18-24°C). Keep the containers in a warm area, such as near a sunny window, or use a seedling heat mat if necessary.
- Check the soil moisture regularly and mist if it starts to dry out. Be careful not to overwater, as excessive moisture can lead to fungal issues. Aim to keep the soil consistently moist but not waterlogged.
- Sempervivum seeds typically germinate within 1-3 weeks, though it can take longer for some varieties. Once the seedlings emerge, remove the plastic wrap or lid to improve airflow and reduce humidity.
- When the seedlings have grown their first set of true leaves, they can be transplanted into individual pots. Carefully lift the seedlings using a small spoon or transplanting tool and gently plant them in their new containers, leaving adequate spacing between each plant.
Use This Vodka Hack to Germinate Seeds & Propagate Cuttings Quickly
Taking Care of Hens and Chicks After Propagation

:max_bytes(150000):strip_icc():format(webp)/tray-of-succulents-130-d113043-e1582655328392-4d1898ea7e4f4f7796e40aa805b68f4e.jpg)
1. Watering
Once established, hens and chicks are drought-tolerant plants. Water sparingly, allowing the soil to dry out between waterings. Overwatering can cause root rot and other issues. Moisten the growing medium only when the topsoil is completely dry to the touch.
Watering frequency will depend on the climate, pot size, and soil conditions. During hot weather, water more frequently while reducing watering in cooler months.
Here are the best ways to water plants
2. Light and Temperature
Hens and chicks thrive in full sun to partial shade. Place the pots in a location that receives at least 4-6 hours of direct sunlight per day.
These succulents can tolerate a range of temperatures but prefer moderate temperatures between 60°F to 90°F (15°C to 34°C). They can tolerate brief periods of colder or hotter temperatures but may suffer if exposed to extreme conditions for prolonged periods.
3. Maintenance
Remove any dried or wilted leaves, as they can attract pests or promote diseases. Fertilization is generally not necessary for hens and chicks grown in pots. If desired, you can apply a diluted, balanced succulent fertilizer during the active growth period in spring and summer.